• Skip to main content
  • Skip to primary sidebar

Biscuits & Burlap logo

  • Home
  • Browse Recipes
  • About Us
  • Contact Us
  • Subscribe
menu icon
go to homepage
search icon
Homepage link
  • Home
  • Browse Recipes
  • About Us
  • Contact Us
  • Subscribe
    • Facebook
    • Instagram
    • Pinterest
  • ×

    Home

    Published: Aug 14, 2016 · Modified: Sep 16, 2021 by Pam

    DIY Bed Skirt That You Adjust to the Height of Your Bed

    Thanks for sharing!

    8651 shares
    • Share
    • Tweet
    • Yummly
    • Email

    Do you struggle with getting your bed skirt just the right length? This one is fully adjustable and can be made in less than 3 hours for about $30.

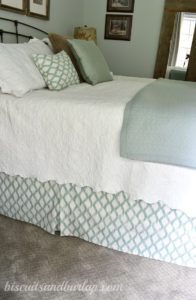
    Do you struggle with getting your bed skirts just the right length?  I know I did, and all I could find were basic colors or sets that included bed skirts.  I’m sure you could have one custom made, but no idea how much THAT would cost.  I bet way more than the $32 I paid for this fabric.

    Bed skirt-5

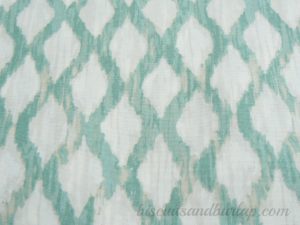
    The colors are perfect and the price was right.
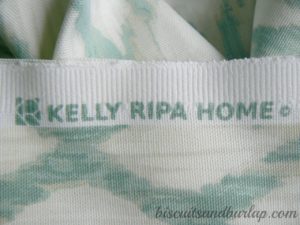
    DIY Bed skirt

    Did y’all know that Kelly Ripa now has a line of decorator fabric? I didn’t. I think Joann’s is the exclusive retailer for them.  I tagged Kelly on Instagram with a shot of her fabric….just in case she wants to come by and check it out. I haven’t heard from her yet. (wink, wink)

    This post contains affiliate links for your convenience.  Click here to read our full disclosure policy

    So many readers have asked about my fabric that I’m including a link here if you want to order it: 
    Kelly Ripa Upholstery Fabric-Floating Trellis Spa

    This post contains affiliate links for your convenience. Click here to read our full disclosure policy.

    HERE’S HOW I DID IT

    This was the easiest project ever.  I do a little sewing, but I think you could do it with that Stitch Witchery stuff if you don’t have a sewing machine, because it’s really just hemming straight lines.

    DIY Bed skirt

    My measurements are for my king sized bed and the height of my bed.  If you want to make a bed skirt for another size just measure the length and width of your bed.  I added an inch top and bottom and ends to hem and about 2 inches to fold across the top of the box springs and attach it.  This bed skirt does not have a deck (the big flat piece of fabric that usually goes between the box springs and mattress.  Not having that is what makes it adjustable.

    If you like our style, click here to keep up with what’s going on at Biscuits & Burlap. Did you know that we are an awesome source of Southern Recipes? We have lots of old favorites AND some with a new twist.

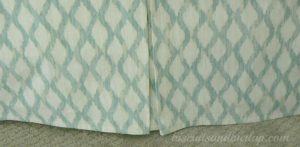
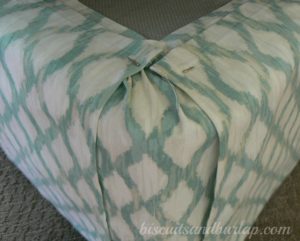
    BOX PLEAT IN THE MIDDLE OF THE SIDES

    I thought adding a box pleat made it look ever so classy.  I added 6″ to do that.

    custom bed skirt

    This close up shows what I mean.  You would do your hemming (ironing each hem as you go) and then come back and add the pleat and iron it in place, then go back over it with the machine or Stitch Witchery stuff.  You could do without the pleat and you would just have a plain, flat panel.  If your room is contemporary that would look best. (Subtract 6 inches off the side measurements if you don’t want the pleat).

    If you’re in the market for an affordable, but solid sewing machine I highly recommend mine. I reviewed it here and it’s under $160! 

    best-sewing-machine

    This shows the measurements I used for cutting.

    drawit-diagram

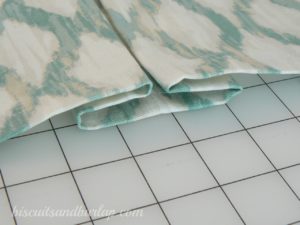
    The corners are just little squares, that you fit in place, like so, and then the flat panels go on top.

    DIY Custom Bed skirt

    THIS IS THE BEST PART ABOUT THIS BED SKIRT!

    You don’t even have to move the mattress off to put these on. Seriously!  I use T Pins and slide them through the bed skirt straight into the box springs at an angle.  I did this by myself, just holding the mattress up a little with one hand and using the other to pin. Update: A reader tells us that she used these twist upholstery pins and thought they stayed in place better. Mine haven’t swifted with the T Pins, but you may want to use these.

    DIY-Bed skirt
    I made this beds kirt in less than 3 hours! It's adjustable to the height of your bed and I put it on by myself.

    I’m pretty happy with the way this turned out, and thrilled with the small amount of time and money, too!

    The Home Tour Part 3 covers the Master Bedroom. Check it out here.

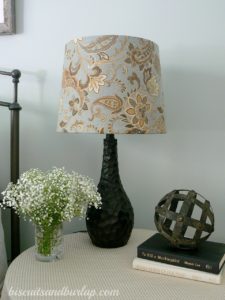
    This Fabric Covered Lampshade was even quicker and cheaper than the DIY bed skirt!

    lampshade-diy


    I found a few more fabrics for you that I think would make beautiful bed skirts. Click the images or the link below each image for more information or to search for other fabrics. Just go into Home Decor fabrics and choose something medium weight.
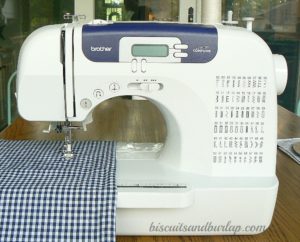
    If you’re sold on my Brother sewing machine (under $160) you can click here to order.

    If you want to use my exact fabric you can order it by clicking the link below:
    Kelly Ripa Upholstery Fabric-Floating Trellis Spa

    I ordered 4 yards of fabric and had enough left over for a couple of small pillows. Don’t forget your T Pins for attaching your bed skirt and Stitch Witchery if you don’t sew. And, please y’all, feel free to comment or drop an email with questions.  This is a project anyone can do and it will make your bedroom look awesome!
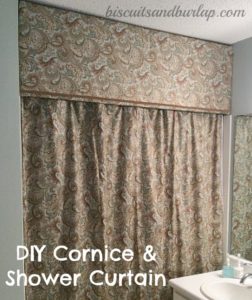
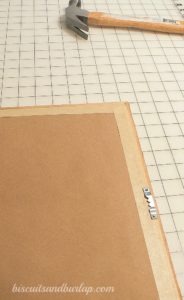
    This Shower Curtain and Cornice is one of our most popular how to posts, even though it’s an early one.  You might like that project too.

    cornice-title

    DIY Photo Framing on the Cheap. That’s one you don’t want to miss.

    Photo Framing - DIY

    Wow, you found an old post! Did you know we’re a food blog now?

    If you love food, especially Southern food, you’re going to love what we’ve done with the place! Check out some of our favorite recipes below.

    • Cajun-Crab-Dip
      Cajun Crab Dip
    • Italian Sausage Soup is a hearty soup full of flavorful vegetables and pasta.
      Itlian Sausage & Veggie Soup
    • Complete instructions for smoking ham (non-spiral-sliced) on the Big Green Egg
      Smoked Ham on the Big Green Egg
    • skillet focaccia bread is fragrant and delicious. It's perfect for a first-time bread baker.
      Skillet Foccacia
    • This sauce will sundried tomatoes and olives is great with chicken, over fish, or with pasta as a vegetarian dish
      Sundried Tomato Sauce for Chicken
    • This easy potato soup comes together easily using baked potatoes and is just the way you like it when garnished with all of your favorite toppings.
      Easy Loaded Potato Soup
    • Savory Dutch Baby will impress everyone, but is so easy. It's the perfect dish for brunch or dinner.
      Savory Dutch Baby
    • Jambalaya Dip
      Jambalaya Dip
    • Maple Bourlbon Butternut Squash with Bacon
      Maple Bourbon Butternut Squash with Bacon

    Categories: Southern Classics Tags: decor, projects

    Reader Interactions

    Comments

    1. Susan says

      August 14, 2016 at 12:52 pm

      Very Pretty!

      Reply
      • Pam says

        August 14, 2016 at 9:43 pm

        Thanks, Susan.

        Reply
        • Judy says

          March 06, 2020 at 1:22 pm

          Looks beautiful. I didn’t notice a mention on the depth of the box spring. I had to opt for the shorter one since my new mattress was so high. That would change the measurements along with the bed size.

          Reply
          • Pam says

            March 06, 2020 at 3:14 pm

            Hi Judy, The depth of the mattress and/or box springs don’t matter. That’s the whole point – you can have a bedskirt that’s the right length regardless of how high your bed is. Hope that answers your question.

            Reply
    2. Cindy Weidinger says

      August 14, 2016 at 1:35 pm

      Gorgeous!!!

      Reply
      • Pam says

        August 14, 2016 at 9:44 pm

        Thank you,Cindy!

        Reply
    3. Dori says

      August 14, 2016 at 5:18 pm

      Very pretty!!

      Reply
      • Pam says

        August 14, 2016 at 9:44 pm

        Awwww, Thanks!

        Reply
    4. Ana Cristina Oliver says

      August 14, 2016 at 8:17 pm

      Absolutely beautiful, Pam! I love the colors. It’s very warm, airy and clean looking. You are very creative and have impeccable taste! Thanks for sharing!

      Reply
      • Pam says

        August 14, 2016 at 9:45 pm

        As always, thank you, Cristina!

        Reply
    5. Sandy says

      August 15, 2016 at 4:23 pm

      LOVE this! Love the colors and the look!

      Reply
      • Pam says

        August 16, 2016 at 8:16 am

        Thanks, girlfriend!

        Reply
    6. Stacey says

      August 15, 2016 at 4:47 pm

      Way to go! Your new bedskirt looks fantastic and you sure saved $$. 🙂

      Reply
      • Pam says

        August 16, 2016 at 8:16 am

        Thank you, Stacey. I like that $ saving part 🙂

        Reply
    7. Mary-the boondocks blog says

      August 16, 2016 at 3:55 am

      How smart looking and easy is that. And it is also a snap to remove and wash!

      Reply
      • Pam says

        August 16, 2016 at 8:18 am

        You’re so right! I didn’t think to mention that.

        Reply
    8. Nancy says

      August 29, 2016 at 1:32 am

      I made these for our guest room double bed. To make the sewing even easier, I used the selvage edge, which would be under the mattress when completed. Thanks so much for your tutorial.

      Reply
      • Pam says

        August 29, 2016 at 7:32 am

        Great idea, Nancy!

        Reply
    9. sandy says

      September 20, 2016 at 9:44 am

      I love it…..Just the right colors…..I managed to track down the fabric. I must say it is taking me more than 3 hrs….but it will be worth it. Wondering about your comforter…..mattellase….where did you get it? and what size for a king bed?

      Reply
      • pam says

        September 20, 2016 at 7:57 pm

        Thanks, Sandy! I’m sorry it’s taking you longer. I do have a work table with the cutting mat on top so that makes projects go along quickly. Would you believe the coverlet came from JC Penney? Very inexpensive, washes great. I just ordered king

        Reply
        • sandy says

          September 20, 2016 at 8:13 pm

          thank you so much, Pam

          Reply
        • Muriel Moore says

          June 30, 2017 at 7:38 pm

          I love mattellese bed covers, have two. One for summer and another for the rest of the year. They wash so great. Back in point due to the height of my bed I had to remove my. Box springs for a piece of luan to set my mattress on. So far this looks to be the easiest skirt to make. Thanks.

          Reply
          • Pam says

            July 04, 2017 at 9:37 pm

            It is really easy, Muriel. Good luck with yours. I’m about to make them for my granddaughter’s antique twin beds too.

            Reply
          • V says

            August 30, 2017 at 11:31 pm

            How will you attach the skirt to the luan?

            Reply
    10. Evelyn Byrne says

      September 24, 2016 at 10:16 am

      I love your tutorial,thanks ,the bed skirt looks great ,I will be making one for sure

      Reply
      • Pam says

        September 24, 2016 at 11:02 am

        Thank you, Evelyn. Come back and let us know how yours turns out!

        Reply
    11. Beverly says

      October 09, 2016 at 2:58 pm

      OMG……This is absolutely fabulous. A woman after my own heart..saving money and making something that nobody else has. I will be making one of these for my newly decorated master bedroom. Going to Joanns today to check out fabric. Thanks so much for a great tutorial and all the inspiration.

      Reply
      • Pam says

        October 09, 2016 at 7:33 pm

        Thanks for the kind words, Beverly! I can’t believe this was such a quick and easy project, but one of my favorites and apparently a lot of others’ too! Be sure to check out the fabric.com choices. I love the one I used, but several at the bottom of the post have me tempted to make another bed skirt. It would be easiest enough to change out and have “seasonal” bed skirts. How cool is that?

        Reply
      • Linda Freimuth says

        January 18, 2021 at 12:01 am

        You can do some checking of the fabrics on line before as some Joann’s have a better selection than others.

        Reply
    12. Shirley @Housepitality Designs says

      October 10, 2016 at 8:51 am

      This is magnificent!!!…did not know Kelly Ripa had a line of fabrics…

      Reply
    13. Margaret says

      October 14, 2016 at 2:50 pm

      Awesome, you just made my day.

      Love what you did with the Kelly Ripa Fabric on the bed skirt. Imitation is the sincerest form of flattery, hope you don’t mind

      Reply
      • Pam says

        October 15, 2016 at 6:57 am

        Absolutely not! This was so easy I’m thinking of having bed skirts that I change seasonally. It can be like having a new room every few months!

        Reply
    14. Sharon Osler says

      October 16, 2016 at 1:06 pm

      As the fabric width is 54″, did you seam or pleat the end panel, the width of mattress? King or even queen is wider than that. Thanks for the beautiful demo..

      Reply
      • Pam says

        October 16, 2016 at 5:40 pm

        Hey, Sharon. I did seam my fabric and hid it in the box pleat. However, it wouldn’t have been necessary if I hadn’t wanted the pattern on the fabric to run that way. Depending on your fabric design you could cut the pieces the length of the fabric, instead of the width. I hope that helps.

        Reply
    15. Sonia says

      November 05, 2016 at 12:19 am

      Love this. So, so pretty. Where did you get the blue blanket (?) that’s folded at the end of the bed and the decorative pillows? I just love the colors you selected.

      Reply
      • Pam says

        November 05, 2016 at 8:25 pm

        Thank you, Sonia. That blue quilt came from Bed, Bath and Beyond, but a number of years ago. It’s one of those pieces that just hangs with you. The pillows? One little one was from leftover fabric from the lampshade post. Have you seen it? The others were just quickly picked up at Homegoods. I plan to make a couple of pillows with leftover fabric from the bed skirt, but haven’t done it yet.

        Reply
    16. Tina says

      December 10, 2016 at 7:51 pm

      Nice project. I can’t find the K.R. fabric where I live. Can you tell me about what weight this fabric is?

      Reply
      • Pam says

        December 12, 2016 at 4:20 pm

        Thank you, Tina. It’s a medium weight fabric. I actually just added a link in the blog post for ordering the fabric.

        Reply
    17. Beth says

      January 06, 2017 at 11:44 am

      Would have loved to see how the corners looked at the floor. Not exactly sure how a square piece of cloth would hang on a corner.

      Reply
      • Pam says

        January 07, 2017 at 12:12 pm

        Beth, Sorry I didn’t get my photo taken low enough to show, but they hang perfectly even with the side and end pieces. I just adjusted where I pinned them into the box springs as I went around the corner. I hope that makes sense.

        Reply
    18. Amy Renaud says

      March 19, 2017 at 3:03 pm

      Love this look!

      Reply
    19. Kathleen says

      April 04, 2017 at 12:46 pm

      Fabulous idea, great fabric options THANK YOU

      Reply
    20. Susanna says

      May 15, 2017 at 1:23 pm

      Thanks for sharing your tutorial. This is a project I’ve been putting off for 2 years and your instructions made it easy enough to finish in an afternoon. Nothing complicated about this project. I just made sure I ironed all the creases and hems before sewing to make sure I had a real nice finish.

      Reply
    21. Marilyn Pritikin says

      June 24, 2017 at 1:25 pm

      Great ideas. I’m trying to figure out a way to do this with split corners for my antique brass bed. Any ideas? Thank you.

      Reply
      • Pam says

        June 24, 2017 at 1:59 pm

        Hmmm…. Can’t quite visualize that. Maybe you can send a photo and we can take a look.

        Reply
    22. Ssndy says

      February 12, 2018 at 11:55 am

      I have done this using a bed sheet. You have a lot of fabric to use…just pick the size sheet you would need. There are a lot of nice prints available.

      Reply
    23. Cleo says

      March 03, 2018 at 1:43 pm

      I’m trying to figure out how you cut the fabric. You list the piece as 20″ x 84 (2), so did you cut it at 40 inches (20+20) across the 54 inch width and 84 inches up the fabric? That’s fine with this pattern but what about the Premier Prints Feather Silhouette Twill Canal? Cutting it that way would have the feathers pointing to the wall instead of the floor right or am I missing something?

      Reply
      • Pam says

        March 03, 2018 at 2:56 pm

        You are correct, Cleo. I made efficient use of the fabric because I was happy with the way it looked turning the pattern. As I’m thinking about how to handle the feather pattern I believe what you could do is piece the sides together so you’d be putting together two pieces that are 42″ each to come up with one 84″ piece. If you made the box pleats in the middle like I did, the seam where you pieced it together wouldn’t show. I hope that will work for you.

        Reply
    24. navy blue bed skirt says

      March 13, 2018 at 4:14 am

      The data given by you is too great and exceptionally well and aanyalinen also give this produced navy blue bed skirt its too comfortable With great quality in low price.

      Reply
    25. Michele says

      April 18, 2018 at 3:20 pm

      I love this idea. Do you know how I could do something similar for a bed without a boxspring? It is a metal bed frame so the wrap around that you did with pins would not work for me because there is no boxspring to pin to. But, I want something that will attach to the metal. Any suggestions or ideas?

      Reply
      • Pam says

        April 19, 2018 at 8:33 am

        Michele, I’ve actually switched to that type of bed since I made the bed skirt and wrote the post. I’m still using the same bed skirt but I attached it to the mesh that wraps around the metal frame with safety pins. When the sheets are changed you usually have to do a little straightening, but on a daily basis it looks great! Good luck

        Reply
    26. Sally says

      May 06, 2018 at 3:24 pm

      I want to make this beautiful bedskirt. How much fabric did you use for a king bed with a pleat?

      Reply
      • Pam says

        May 06, 2018 at 3:54 pm

        Thank you, Sally! I bought 4 yards of fabric and I had enough leftover to make two small pillows.

        Reply
    27. Nancy says

      June 24, 2018 at 12:04 am

      Thank you for your inspiration! After many hours searching on-line for dust ruffle for an adjustable bed I found your tutorial. I sew often but hadn’t considered that I can choose my own fabric! Just takes more time, but will be worth it.

      Reply
      • Pam says

        June 25, 2018 at 10:03 pm

        So glad we could help, Nancy. If you’re like me the hours you spent searching online could have gone into the few hours it will take to have your own custom designed bedskirt.

        Reply
    28. Luanne says

      July 17, 2018 at 7:37 am

      I made this last year from your tutorial in the exact material as it was so perfect for our master bedroom. It came out perfectly and has ended the search and struggle to find a bedskirt that doesn’t drive us crazy when making the bed. The only thing I did differently was to use the round twist in upholstery pins that twist into the foundation as I found other T shape pins pulled out.

      Reply
      • Pam says

        July 17, 2018 at 10:37 am

        Luanne, Thank you so much for the kind words. We’re so happy it worked out for you. The round twist pins are a good idea. I think I’ll add them into the post.

        Reply
    29. rp17 says

      July 08, 2019 at 12:24 pm

      Would you be able to add a photo that includes the whole corner piece when attached to the bed? I can’t sew so am going to have my mother-in-law make ours with some fabric I bought, and am interesting in seeing how the corners lay compared to the other panels or if we want to try a different way.
      Also, ours will be going on a metal frame so I’m not sure the corners will look as nice without the thick rounded corner of the boxspring to attach to. I know you said yours is now on a metal frame as well, and I’d love to see how that looks.

      Reply
      • Pam says

        July 11, 2019 at 3:08 pm

        Renee, I just took this quick shot with my phone. Hope this helps. corner

        Reply
        • rp17 says

          July 12, 2019 at 5:44 pm

          That is helpful, thank you! I have one more question (about the measurements). A standard king is 80″ long, but your side pieces are only 76″. Is this because they don’t need to be the full width since the corner pieces will do that job?

          Reply
          • Pam says

            July 16, 2019 at 10:12 am

            Yes, exactly!

            Reply
    30. Kristy says

      March 19, 2020 at 9:08 pm

      Looking everywhere for a tutorial for DIY wrap around skirt. When I found yours, I hit the jackpot. This is perfect for my bed/room. I even love the T-pin suggestion. I’ve used those coiled pins and yes they hold great, but so hard to take off when it’s time for laundry. T-pins look more user-friendly. Thank you so much for sharing this project!

      Reply
    31. NAVYA SOMA says

      June 28, 2020 at 3:07 pm

      I love this!!!! How many yards of fabric do I need to buy to cover a queen size box spring and frame together. I will be making one bed skirt to cover both the box spring and the metallic bed frame. So many yards of fabric should I approximately buy? Thanks

      Reply
      • Pam says

        June 29, 2020 at 10:39 am

        Navya, It would be impossible for me to give you yardage without knowing a lot of information (pattern repeat, fabric width, height of your bed, etc etc.) If you read through the post and follow the directions you should be able to do it yourself. You need to measure your bed, add for hemming, add for attaching to the box springs and add for box pleat if you want to include one. Come back and let us know if you have any trouble.

        Reply
    32. Joyce says

      October 10, 2020 at 12:43 pm

      Hi Pam, thank you so much for this wonderful DIY. I’m actually taking a bed sheet to the tailor today for her to cut and hem it for me as I do not do well with cutting material straight! ;). I have a question regarding the end panel. Wouldn’t I subtract 4″ on each side of the end panel (just as you did on one end of the sides) to accommodate the corner panels? So my thinking is that for a King bed that is 76″ wide, I would add 1″ for seam on each side = 78″, then subtract 8 inches (4″ on each end), for an cut piece of 70″ and finished piece of 68″? In your example, your end shows the cut end would measure 78″ and the finished end would be 76″ which I believe only accounts for the hem, and not subtracting to adjust for the corner panels. I hope I’m making sense. Could you please clarify for me? Many thanks!

      Reply
      • Pam says

        October 10, 2020 at 5:54 pm

        Hi Joyce, I think I understand what you’re saying, but I don’t think you would need to subtract from the end piece for the corner pieces. The reason is that the end piece overlaps the corner pieces. There’s one photo that sort of shows what I mean. The corner pieces are really just to give it a finished look and prevent any gap between the sides and the end that would show your bedframe. I hope that’s what you were getting at and I’ve explained it okay.

        Reply

    Tell us what you think! Cancel reply

    Your email address will not be published. Required fields are marked *

    Recipe Rating


    Primary Sidebar

    Hey, y'all!

    Pam and Sara sitting on blanket with picnic.
    Photo cred: Angie Webb Creative

    We’re Pam and Sara, a Southern mother/daughter team on a mission. We’re here to help you keep those precious food memories alive and create new ones, too. 

    Read more-

    Recent Posts

    • Pepper Jack Pimento Cheese with Jalapenos
    • 3 Ingredient No Bake Cheesecake
    • Picnic Charcuterie Board – 3 Easy Steps
    • Steak Crostini (Greek Style)

    Christmas Dishes

    • Coconut Chocolate Chip Cookies with Brown Butter
    • Key Lime Cookies
    • Brioche French Toast Casserole
    • Vegetable Au Gratin

    Footer

    ↑ back to top

    About

    • About Us
    • Disclosures and Privacy Policy

    Newsletter

    • Sign Up for emails and updates

    Contact

    • Contact Us
    • Work With Us

    Copyright © 2021 Biscuits & Burlap

    8651 shares